Hello Guys welcome back to my blog, Today in This is a tutorial on creating a quiz in Android. After this tutorial you will be able to create your own Android App with your own quiz.


Follow the instructions given below to learn how to create a quiz app in SketchWare.
1. Download Sketchware App for Android devices.
2. Open Sketchware and start a new project. Enter the app name and other details as per your wishes and click save.
3. Now in the View area (main.xml), insert a Scroll(V) and inside that a Linear(V). Set the width of both the Layouts to match parent and set the padding of Scroll(V) to 0. Also set the background color of Linear(V) to green or a color of your choice, and gravity of Linear(V) to center_horizontal, center_vertical.
 4. Now insert 4 button widgets (depends on your requirement), one each for each of the quiz. Each quiz can have several questions. Rename the buttons as Quiz1, Quiz2, Quiz3 and Quiz4 respectively. Now for each of the buttons: increase font size to 18, set margin of each to 8, set text style to bold, and set background color to white.
 5. Click on main.xml and add four more views. Name them as quiz1, quiz2, quiz3, and quiz4 respectively.
 6. Move to Logic area. Add a new Intentcomponent and name it option (or anything else you want).
 7. Next, in Button:button1 onClick event use following component blocks to set screen to quiz1:
Intent option setScreen Quiz1Activity
StartActivity option
 Use same logic for other buttons to set screen to Quiz2, Quiz3, and Quiz4.
8. Now move to View area and select quiz1.xml. Inset a Linear(V) (linear1). Set it's width to match_parent and set it's background color to green.
Inside this insert a Linear(H) (linear2), a Linear(V) (linear3; set layout_height of this layout to wrap_content), and another Linear(V) (linear4). Set width of all these linears to match_parent.
9. Increase weight of linear2, linear3 and linear4 to 1, 2, and 2 respectively. Also for the three linears, set margin to 8, and set background color to white.
 10. Insert a Textview (textview1) in linear2. Make it's width match_parent, text_size 18, text_style bold, and lines 3.
In linear3, insert four Linear(H) and inside each of these four linears insert a checkbox and a Textview. Set text of each checkbox to empty. For Textview change text_size to 18 and text_style to bold. Also insert a button (button1) in linear3 and change it's layout_gravity to right, and text to 'Next' or '>>'.
In linear4 Insert three linears and a textview in each linear. In second and third textview write correct answers to all the questions. Insert a button (button2) below that, change it's layout_gravity to center_horizontal and name it as Menu.
 11. Now move to Logic area of quiz1 (Quiz1Activity.java).
Create a new Intent component and name it intent.
Go to onCreate event. Add three new blocks and name them as Start, Questions, and Answers. Also add three new number variables namely ques, ans, and score. Add Start block in onCreate event.


 12. Add five new events, one each for the four checkbox onClick, and one for textview1 onClick.

13. In Start defineFunction use following blocks:
Set ques to 1
Set score to 0
textview1 setEnable true
textview1 setText Click here to start Quiz
linear2 setVisible VISIBLE
linear3 setVisible GONE
linear4 setVisible GONE

14. In Questions defineFunction use if then blocks and write all the questions and options for each of the questions, as shown in the image below.
If ques = 1 then
textview1 setText Your first question?
textview2 setText option 1
textview3 setText option 2
textview4 setText option 3
textview5 setText option 4
Add all the questions and their options one by one for each value of ques. I added four questions. After adding all questions use the block as shown below.
If ques = 5 then
linear2 setVisible GONE
linear3 setVisible GONE
linear4 setVisible VISIBLE
textview6 setText join Your Score is: andtoString score without decimal

15. In Answers defineFunction set variable ans to correct option for each question.
If ques = 1 then
set ans to 1
If ques = 2 then
set ans to 3
If ques = 3 then
set ans to 1
If ques = 4 then
set ans to 4

16. In checkbox1 onClick, setChecked false all other checkbox. Do this for each of the checkbox onClick.
 17. In textview1 onClick, use following blocks:
textview1 setEnable false
linear3 setVisible VISIBLE
Questions
Answers
 18. In button1 (which is our Next button) onClick use following blocks:
If checkbox1 getChecked then
If ans = 1 then
score increase 1
ques increase 1
checkbox1 setChecked false
Questions
Answers
Use these blocks for each of the checkbox.
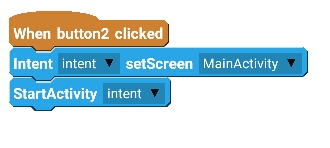
 19. On button2 onClick, use setScreen block to move to MainActivity.
Intent intent setScreen MainActivity
StartActivity intent
 20. Now use same codes to create more quizzes, in this case Quiz2, Quiz3, and Quiz4.
21. Save and run the App. You'll find your first Android quiz app is ready and working.


Intent option setScreen Quiz1Activity
StartActivity option

8. Now move to View area and select quiz1.xml. Inset a Linear(V) (linear1). Set it's width to match_parent and set it's background color to green.
Inside this insert a Linear(H) (linear2), a Linear(V) (linear3; set layout_height of this layout to wrap_content), and another Linear(V) (linear4). Set width of all these linears to match_parent.
9. Increase weight of linear2, linear3 and linear4 to 1, 2, and 2 respectively. Also for the three linears, set margin to 8, and set background color to white.

In linear3, insert four Linear(H) and inside each of these four linears insert a checkbox and a Textview. Set text of each checkbox to empty. For Textview change text_size to 18 and text_style to bold. Also insert a button (button1) in linear3 and change it's layout_gravity to right, and text to 'Next' or '>>'.
In linear4 Insert three linears and a textview in each linear. In second and third textview write correct answers to all the questions. Insert a button (button2) below that, change it's layout_gravity to center_horizontal and name it as Menu.

Create a new Intent component and name it intent.
Go to onCreate event. Add three new blocks and name them as Start, Questions, and Answers. Also add three new number variables namely ques, ans, and score. Add Start block in onCreate event.


13. In Start defineFunction use following blocks:
Set ques to 1
Set score to 0
textview1 setEnable true
textview1 setText Click here to start Quiz
linear2 setVisible VISIBLE
linear3 setVisible GONE
linear4 setVisible GONE

14. In Questions defineFunction use if then blocks and write all the questions and options for each of the questions, as shown in the image below.
If ques = 1 then
textview1 setText Your first question?
textview2 setText option 1
textview3 setText option 2
textview4 setText option 3
textview5 setText option 4
Add all the questions and their options one by one for each value of ques. I added four questions. After adding all questions use the block as shown below.
If ques = 5 then
linear2 setVisible GONE
linear3 setVisible GONE
linear4 setVisible VISIBLE
textview6 setText join Your Score is: andtoString score without decimal

15. In Answers defineFunction set variable ans to correct option for each question.
If ques = 1 then
set ans to 1
If ques = 2 then
set ans to 3
If ques = 3 then
set ans to 1
If ques = 4 then
set ans to 4

16. In checkbox1 onClick, setChecked false all other checkbox. Do this for each of the checkbox onClick.
textview1 setEnable false
linear3 setVisible VISIBLE
Questions
Answers
If checkbox1 getChecked then
If ans = 1 then
score increase 1
ques increase 1
checkbox1 setChecked false
Questions
Answers
Use these blocks for each of the checkbox.

Intent intent setScreen MainActivity
StartActivity intent
21. Save and run the App. You'll find your first Android quiz app is ready and working.